

Scheduling an email in Gmail is simple & straight forward. Follow the step by step process to schedule emails in Gmail from web & mobile apps.
Schedule Email from your Browser (Mac/Windows)
Compose email as you normally would, but don't click on send yet

Click on the arrow beside send & click on "Schedule send"

Set of pre-defined dates sets show up. You can choose from one of these schedules or proceed to choose your custom time. Remember to double check timezone here. Because your email is scheduled based on this time zone
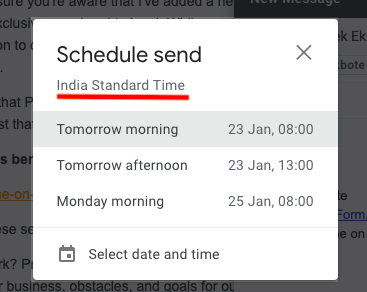
Choose from a custom schedule & click on schedule send button

You will see a confirmation of your schedule email as a notification

Scheduled email will show up under "Scheduled" section

Hop on to scheduled & click on "Cancel send" to stop the schedule

Once you cancel, your email will move to drafts. You can choose to schedule it at another time

Schedule Email from your Mobile App
Go to compose email & click on the 3 buttons on the right top corner

Choose Schedule send from the options shown. Popular pre-defined date sets show up. You can choose from one of these or choose your custom time

The timezone is automatically picked based on your settings. It is important to note this before scheduling the email

Once you decide on a schedule, your email will show up under "Scheduled" section

You can choose to stop the email by clicking on "Cancel send" button

Did you know - You can record your video & send on your emails with Videoform.
From right inside Gmail, you can record a custom video for each of your prospects & add a personal touch to your sales process.


.svg)

